
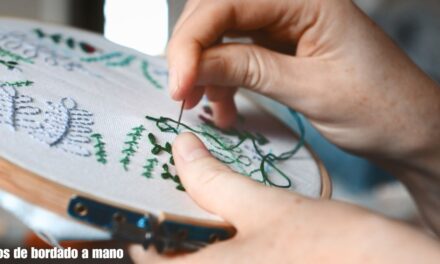
Embroidery is a captivating art form that transforms plain fabrics into stunning works of art using needles and thread. It has been practiced for centuries in various cultures worldwide. Each embroidery piece reflects the creativity and skill of the artist, whether it’s a delicate flower, an intricate pattern, or a detailed portrait. The versatility of embroidery allows it to embellish clothing, accessories, and home decor items, adding elegance and personalization. It is a hobby accessible to everyone, promoting mindfulness and relaxation through the therapeutic process of stitching.
Em-broidery has become a cherished tradition, with embroidered garments often becoming treasured heirlooms passed down through generations. These pieces carry the stories and memories of those who created and wore them. Whether done by professionals or enthusiasts, embroidery offers a chance for individuals to embark on their own creative journey, expressing their imagination and bringing unique designs to life. With just a needle, thread, and patience, anyone can explore the art of embroidery.
Embroidery has come back into fashion in recent years, combining ancient methods with modern artistic expressions. Artists use embroidery as a medium for self-expression, pushing the boundaries of what em-broidery can achieve. Unconventional materials, mixing styles, and experimental approaches have expanded the possibilities within this art form. Embroidery continues to inspire both seasoned artists and beginners, offering a platform for creativity and allowing emotions to be evoked through intricate stitches.
In conclusion, em-broidery is an ancient art form that remains relevant and captivating today. Its ability to transform fabrics, personalize items, and carry stories makes it a cherished practice. Whether as a hobby or a professional pursuit, embroidery provides an avenue for self-expression and creativity. It is an art form that invites individuals to slow down, engage in mindful stitching, and witness the beauty that can be created with just a needle and thread.
How to Embroider With Hands For Beginners
This comprehensive guide will walk you through everything you need to know to get started with hand embroider.
Gathering Your Embroidery Supplies

Before diving into stitches, let’s gather the essentials. Here’s what you’ll need:
Embroidery hoop: This wooden or plastic ring keeps your fabric taut and helps you achieve even stitches. Choose a hoop slightly smaller than your fabric for a snug fit.
Fabric: Cotton or linen fabrics are popular choices for embroider due to their even weave. For your first project, consider using a lightweight fabric like cotton quilting fabric.
Embroidery floss: This is a special type of thread, typically made from six strands of cotton. It comes in a vast array of colors, allowing you to bring your designs to life.
Embroidery needles: The size of the needle depends on the weight of your fabric. A size 7 or 8 needle is a good starting point for most cotton fabrics.
Scissors: A small, sharp pair of scissors will help you snip thread and trim fabric.
Embroidery pattern (optional): There are countless free and paid embroidery patterns available online or in craft stores. For beginners, a simple geometric or floral pattern is ideal.
Pencil or fabric marker: Use this to transfer your chosen pattern onto your fabric, if you’re using one.
Getting Set Up: Fabric Prep and Pattern Transfer
Pre-wash your fabric: This removes any sizing or chemicals that might affect your stitches. Wash and iron according to the fabric care instructions.
Cut your fabric: Aim for a square or rectangle several inches larger than your embroidery hoop.
Transferring your pattern (optional): If you’re using a pattern, trace it onto your fabric using a pencil or fabric marker. There are also methods like using carbon paper or water-soluble markers, but these might require a bit more practice.
Tip: If you’re not using a pattern, you can freehand simple shapes or letters directly onto your fabric.

The Em-broidery Hoop: Your Stitching Canvas
- Loosen the screw of the embroidery hoop.
- Place your fabric flat on the inner hoop.
- Stretch the fabric taut and even, like a drum.
- Align the fabric with the outer hoop.
- Press the outer hoop down onto the inner hoop, starting from one side and working your way around.
- Tighten the screw gradually, ensuring the fabric remains evenly taut.
- Tip: The fabric should be firm but not so tight that it wrinkles or feels like it might tear.

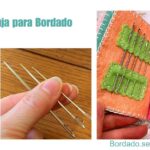
Threading Your Needle: The Art of the Fine Line
- Cut a strand of embroidery floss, about 18-20 inches long.
- Separate the six strands if desired. For most beginner stitches, using all six strands together creates a bolder look. You can experiment with fewer strands for a more delicate effect.
- Thread one end of the floss through the eye of the needle.
- Dampen the end of the floss slightly with your tongue. This helps it slide through the needle more easily.
- Push the floss gently through the eye of the needle until it reaches the desired length. Leave a tail of about 2-3 inches on the back of the fabric.
- Tip: If threading is a struggle, a needle threader can be a helpful tool.
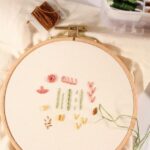
Making Your First Stitches: The Running Stitch
The running stitch is a fundamental embroidery stitch, perfect for beginners. It’s a simple straight stitch used to create outlines and fill larger areas. Here’s how to do it:
- Bring your needle up from the back of your fabric, at a starting point of your design.
- Push the needle down through the fabric, a short distance ahead, following your pattern line.
- Pull the thread until the floss is taut.
- Repeat steps 1-3, making stitches of consistent length.
- Tip: It’s okay if your stitches aren’t perfectly even at first. Practice makes perfect!
Beyond the Basics: Exploring Different Stitches
Once you’ve mastered the running stitch, you can explore a variety of other stitches to create different textures and effects. Here are a few popular beginner-friendly stitches to add to your embroidery repertoire:
Backstitch: This stitch creates a neat line and is often used for outlines or lettering. It’s made by bringing your needle up one stitch length behind your previous stitch, then pushing it down one stitch length ahead.
Stem stitch: This stitch is ideal for creating stems, leaves, or outlines. It’s made by bringing your needle up a short distance ahead, then back down a short distance behind, keeping the thread above the needle as you move.
Satin stitch: produces a solid-filled, smooth surface. It’s made by stitching small, close stitches side-by-side, filling the desired area completely.
French knot: This stitch adds a delightful little bump or “knot” to your embroidery. It’s made by wrapping the thread a few times around the needle, then pulling it through the fabric to create a small knot.
There are many resources available online and in craft stores that offer detailed instructions and visuals for a wider variety of embroidery stitches. Don’t be afraid to experiment and find stitches that you enjoy using!

Keeping Your Stitches in Check: Finishing Touches
As you embroider, here are some tips to keep your work looking neat and polished:
Knotting your thread: When starting or ending your thread, use a small knot at the back of your fabric to secure it. You can hide the knot within your stitches as you work.
Keeping your tension even: Aim for stitches that are consistent in length and tension. This will create a smooth and professional-looking finish.
The back of your embroidery: While the front should be your masterpiece, the back should also be reasonably tidy. Avoid long thread trails or bulky knots that might create bumps on the front.
Tip: If you make a mistake, don’t panic! You can usually carefully snip the stitch and redo it.
Em-broidering Beyond the Hoop: Adding Dimension
Em-broidery hoops are great for keeping your fabric taut, but you can also embroider on other items like clothing, tote bags, or pillowcases. Here are a few things to keep in mind:
Choose the right fabric: Opt for fabrics that can withstand em-broidery without tearing or showing excessive bulk.
Stabilizing your fabric: If embroidering on a finished item, use stabilizer behind the fabric to prevent puckering or warping. You can use tear-away stabilizer that’s removed after stitching, or water-soluble stabilizer that dissolves when washed.
Finishing the edges: Once you’ve completed your embroidery on an item like a tote bag, consider finishing the edges with a simple blanket stitch to prevent fraying.
Embroidery Care: Preserving Your Stitched Stories
Once you’ve completed your beautiful em-broidery project, here’s how to care for it:
Wash gently: Handwashing in cool water with a mild detergent is recommended. Avoid harsh scrubbing or wringing.
Ironing: If needed, iron on the back of the embroidery at a low heat setting.
Tip: Frame your embroidery or turn it into a decorative piece to enjoy for years to come!
Embroidery: A Journey of Creativity and Relaxation
Embroidery is a delightful hobby that allows you to express your creativity while enjoying a calming and meditative activity. With a little practice and patience, you’ll be stitching beautiful designs in no time. So grab your needle and thread, and embark on your embroidery journey today!


